
How to Make Biochar [Fast and Easy Guide]
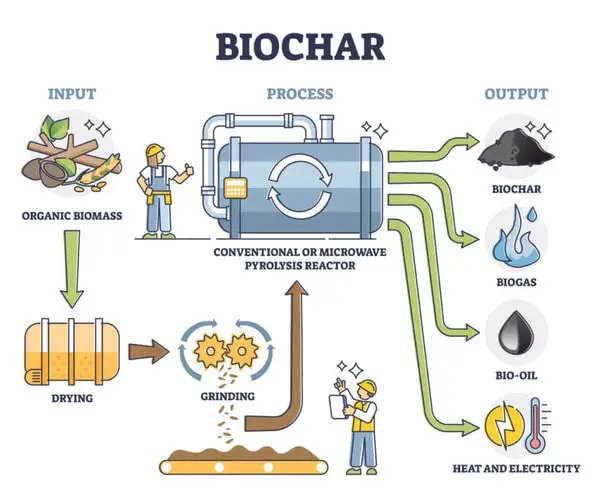
Biochar can be produced from any organic product (wood waste, agricultural waste, sludge, peat). Biochar uses pyrolysis to heat the raw material, which is the heating of organic material with no or little oxygen.
Let’s see in more detail how to make biochar!
How is biochar made?
Biochar is created through a process called pyrolysis (low oxygen burning). The biomass is thermally treated at high temperatures, usually between 750°F and 1390°F (400 and 750°C), in a limited amount of oxygen. It is a stable product, very rich in carbon, which is used for soil enrichment.
This can happen on a large scale in large industrial plants. However, biochar can also be made in a ground pit or a funnel-shaped metal container as you will see in this article.
During pyrolysis there is an irreversible chemical and physical change in the biomass.
How to Make Biochar
The following plant parts(biomass) are suitable for the production of biochar :
- wood
- leaves
- branches of trees and hedges
- grain husks
- trunks of trees
In order to be able to produce biochar from your wood and cuttings, it doesn’t take much, just:
- Wood and trimmings that are relatively dry (easily combustible)
- Water (about 30l, depending on the amount of biochar)
- Large vessel/tub or a ground pit
- Something to start the fire
- A shovel
Step 1: Gather the biomass
The first step is to choose what to burn. Above all, we recommend burning old branches, for example from fruit trees. Most of the time, a lot of branches of wood are produced when the trees are cut.
You don’t have to throw it away, you can easily use it to produce biochar. It is important that the biomass is dry before starting the process.
The fastest results are obtained when the biomass or wood is pre-dried. Indeed, damp wood will slow down the carbonization process.
The tree branches or trunks that we will use to burn them inside the hole, we must cut them with an ax into small portions and classify them according to their diameter.
At this point, you should separate the thicker logs from the thinner ones into 2-3 piles, leaving the thicker, medium-sized, and thinner ones separate. Although we will show the process in the next step, the thick logs will be the first layer you will place in the hole.
For the production of approx. 10 to 20 kg of biochar you need about twice the amount of wood or biomass, preferably in the form of well-dried twigs and branches.
Find a suitable place to start the combustion and pyrolysis of the biomass of your choice.
Step 2: Prepare and start the fire
The second step in how to make biochar is to light a fire at the base of the hole and add the biomass, that is, the logs inside the hole that we have dug in the ground.
It is best to kindle the fire in a small hole in the ground, which should be approx. 30cm deep and 1.5m in diameter.
With a few small branches and paper, the fire can be started in a heat-resistant container.
However, it is also possible to use eco lighters if starting the fire turns out to be difficult.
At the very bottom of the pit, you now layer a small amount of wood and possibly some straw or leaves for kindling , and ignite the whole thing, possibly with a wood lighter.
Step 3: Fill the pit with biomass
After firing the biomass, you can gradually add more wood. Wait until the logs begin to take on a whitish hue and a slightly white layer of ash has formed, then we will place a next layer of logs on top so that the combustion continues.
As soon as a white layer of ash covers, the biomass, keep burning. Add two to three handfuls of new wood. Spread and compact the bottom ash as much as possible to suppress air circulation.
The way to add the logs is staggered, that is, by layers. To achieve the desired result, it is important to reduce the amount of oxygen that the first logs will receive as more layers of logs are placed on top.
Gradually you “feed” the fire with more branches and twigs. Always wait a bit in between so that the fire burns as well and smoke-free as possible !
We will repeat this process until the top, each time the new layers of logs acquire a whitish color.
Step 4: Create Biochar
To make biochar, all you have to do is carbonize plant material in a pyrolysis process: the plant is heated to a very high temperature, without allowing it to burn by preventing the supply of oxygen necessary for the formation of flames.
The principle is the same as in the production of charcoal: wood is heated until the wood gases are released. The wood gases are burned or discharged.
After each layer, further biomass can be added. It is very important to always let enough of the biomass burn off. Biochar from plants is produced from plant biomass at 842°F to 1022°F (450°C – 550°C).
As these layers of logs are placed from the base, there will come a point where the first biomass materials (logs) will not receive oxygen, creating the reaction that has the name: Pyrolysis.
This is what it looks like when the kiln is full. Now you can wait again until the biomass is burned and more biochar is produced.
When placing the last upper layer of thick trunks, you will add a last layer of thinner branches and then you will cover everything with a moist cardboard and soil so that no more oxygen enters and thus finish the whole process.
When you start the fire you can observe a white vapor coming out of this tank: it is the water that comes out of this wood: it is similar to a drying system.
After a certain time, the gas contained in the wood which is being pyrolyzed is recovered, and returned to the combustion chamber to self-fuel. The process takes about 24 hours.
Depending on the composition of the fuel, it can take about 2 to 3 hours until the right time to extinguish is reached. There will be a lot of water vapor when deglazing , be sure to be careful and pay attention to safety!
It is important that there is absolutely no fire left at the end.
When all the biomass has been burned, the fire can be extinguished with plenty of water. The use of watering cans or buckets is very helpful here. The process of extinguishing the fire is very important, otherwise it will not produce biochar, but useless ash.
Step 5: Collect the biochar
Depending on how the ground pit is constructed, the resulting seepage water can simply be collected and used to water plants. Before the freshly created biochar is used further, it should cool down well.
After the newly obtained biochar has cooled down, it can be used as a soil conditioner. Before that, however, it should be “activated”. Composting or fermentation can be used to activate the biochar.
With this simple process, you will be able to obtain the biochar you need for your garden at home and improve the quality of the soil. As you can see in the article, the materials are very affordable and the process is quite easy.
Step 6: Activate the biochar
Biochar activation is all about providing a stable habitat for beneficial microorganisms.
Activation with solid fertilizers.
This activation method consists of leaving a bag of biochar on top of some organic fertilizer ( compost, manure, etc.) for a while. We can also leave the bag resting for a few days where we can capture microorganisms.
Activation with liquid fertilizers.
The best activations will be obtained by mixing biochar with manure tea or compost tea.
We will follow these steps:
- Calculate the amount of fertilizer to use.
- Prepare the organic fertilizer in its liquid form for mixing.
- Mix the liquid fertilizer with enough water resulting from the biochar production.
- Let the mixture stay for 2-3 days.
How to Make Biochar at Home
There are many ways to make biochar at home. Here are two very simple and one slightly more complicated methods:
Some of these use a downdraft oven or stove to make the biochar.
Method 1
The simplest method is to stack dry branches, wood or bamboo about a meter long and light a fire on top. You will probably need newspaper or shacks for the fire to light on top.
Add wood as it burns down, as the fire changes from flames to embers. Pour enough water over it to make sure it goes out completely.
Method 2
The second simple technique for making biochar is similar, but the fire is mostly contained in a pit. This can be a cone one meter high by one meter wide. We use a hole about 120 cm long by 60 cm wide and 60 cm deep.
This allows larger wood to be burned, the hole contains the fire much better than the open fire and allows the fire to be put out with water or dirt on top of the embers.
Method 3
The third method is to use a 55-gallon metal barrel to contain the wood and with a secondary combustion chamber that sits on top of the barrel to burn off any escaping gases.
This method burns cleaner and produces less pollution. The combustion chamber above it can be used as a stove and make use of the heat it produces.
How to Make Biochar in a Pit
If we now have all the things that are necessary for production together, we can start. First, you should find a good spot.
After that, the bottom of the pit or tub should be laid out with easily combustible wood. You can now ignite this and start a small fire. The beginning is not very different from an ordinary campfire.
However, whenever you see a layer of white ash, you should always add more wood and cuttings. If this layer has also burned down and ash is produced again, you put on more.
Carry out these steps until the desired amount of biochar is available or your charred area is full. At the end you wait again until a layer of ash forms.
But instead of refilling, you pour water over everything. However, caution is required here, as the hot embers initially cause the water to evaporate.
So approach carefully and then pour water over the charcoal until the spot is filled with water and there is no more smoke. Now you have to let everything cool down first.
If you are sure that everything has cooled down, you can drain the water if you use a tub. If you did it in a pit, you can use a shovel or fork to get the charcoal out.
Now you have finished, moist biochar. However, some pieces are almost always not fully charred. These must now be sorted out, as they rot very slowly in the ground and therefore have little or no positive effect.
Now you could let the biochar dry naturally, but it holds water so well that it takes a very long time.
How to Make Biochar in a Barrel
The general concept of pyrolysis is to break down matter by heat in the absence of oxygen.
To make the metal barrel:
- 2 metal drums
- 8 threaded screws, with their nuts and washers
- A drill
Here are the steps for how to make biochar in a metal barrel:
- Fill the first barrel with biomass then seal it.
- Place this first barrel in another slightly larger barrel.
- Fill the space between the two barrels with biomass.
- Put biomass on top as well and set it on fire.
- Close the large barrel with a lid equipped with a chimney.
- Air holes in the bottom of the big barrel produce a suction effect and the fire goes down the sides.
- The biomass contained in the small barrel is heated and releases the gases it contains.
- The gases are consumed, but oxidation and combustion cannot take place since the oxygen supply is zero.
- Leave the biochar to cool.
No need to cut green wood in order to produce charcoal. There’s a lot of scrap wood that you can use. You still have to be careful not to poison your biochar, especially if the production is intended for soil amendment. Therefore, beware of heavy metals, paints, glues and galvanized nails.
What can be used to make biochar?
Biochar can not only be made from wood (vegetable charcoal), but from any biomass, such as straw, green waste, solid manure, liquid manure, sewage sludge or fermentation residues.
Biochar can be obtained from agricultural residues or byproducts (wood, corn or wheat tow, rice husk, shells, pomace and pomace, other cellulosic material).
Biochar’s produced with hardwoods have more alkaline pH, more cation exchange capacity and more micro porosity than those obtained with coniferous wood, which have a high specific surface and low ash content.
Advantages and Disadvantages of Biochar in the Garden
| Advantages of biochar | Disadvantages of biochar |
|---|---|
| Increases the water storage capacity of the soil. | Biochar that is not activated removes minerals and water from the soil. |
| Improves soil quality and plant growth. | May contain high levels of harmful PAHs. |
| Improves soil pH at low cost. | There are plants that react negatively to coal/alkaline soil. |
| Binds heavy metals, nitrates and toxins. | Biochar as a trend promotes deforestation. |
| Loosens the soil and improves aeration. | |
| Reduce of greenhouse gas emissions from the soil. | |
| Provides habitat for important microorganisms. | |
| Increasing the efficiency of fertilizer used. |
Main properties of biochar
| Parameter, unit of measure | Value | |
|---|---|---|
| 1. | Net calorific value, MJ/kg | 30-35 |
| 2. | Density, kg / m3 | 260-380 |
| 3. | Carbon content, % wt. | 60-80 |
| 4. | Ash content, % wt. | Less than 6 |
How to use biochar in the garden
Biochar is not a fertilizer, but above all a carrier for nutrients and a habitat for microorganisms. If introduced into the soil untreated, it would absorb and fix nutrients and water from the soil; it could thereby stunt plant growth for months.
In order for its soil-improving properties to take effect, the biochar must first be physically loaded with nutrients and/or biologically activated.
Biochar is intended as a re-naturalizer of a soil, as the solution to a series of problems and not as a substitute for a conventional fertilizer.
Biochar can be associated with compost, in this case the compost will provide the carbonaceous material necessary for the microbial life of the soil while the biochar will help enrich the soil with carbon.
We can certainly try biochar in the garden, in the orchard and in the plant pots on the balcony.
The doses of application of biochar to the soil are very variable depending on the soil conditions, and range from 0.5 kg/m2 up to 5kg/m2 .
A quantity of 1kg/m2, incorporated in the first 15 cm of soil, is a sufficient and valid dose .
It must also be borne in mind that, unlike other soil improvers such as compost and manure, the distribution of biochar will have to be repeated only after another 3 or 5 years , thanks to the fact that it is a very stable product.
Speaking of fertilizer, here is a question many of us wonder: Is Instant Coffee good for plants?
Just take charcoal, shred it into small pieces, soak it with nettle macerate for 24h and then distribute on the ground at a rate of 500g per square meter, simply raking.
About half a liter of activated pure biochar is worked deep into the soil per square meter.
Biochar is activated in contact with freely available minerals and moisture.
This can happen, for example, in a compost heap or with the help of plant manure (e.g. nettle manure).